BongoWaifu Workshop Guide
What is Workshop Editor?
The Workshop Editor is a built-in tool that lets you create and upload custom cat characters to the Steam Workshop. Once uploaded, other players can subscribe to your character and it will appear in their character selector dropdown.
How to Launch
When you click Play in Steam, a launch dialog will appear with two options. Select Workshop Editor to open the editor directly.
Two Character Types
Spine Animated Skeleton
Full skeletal animation using Spine Editor 4.2. Characters have smooth, fluid idle and click animations driven by bones and meshes.
Image Static Sprite
Simple image-based character using 3 PNG files. Easy to create — just draw or export 3 poses (idle, left click, right click).
New to this? Start with Image — 3 PNGs, done in 10–30 minutes. No extra software needed.
Workshop Editor overview showing the Create, Upload, and Manage tabs
IMG-02 • recommended: 1024x768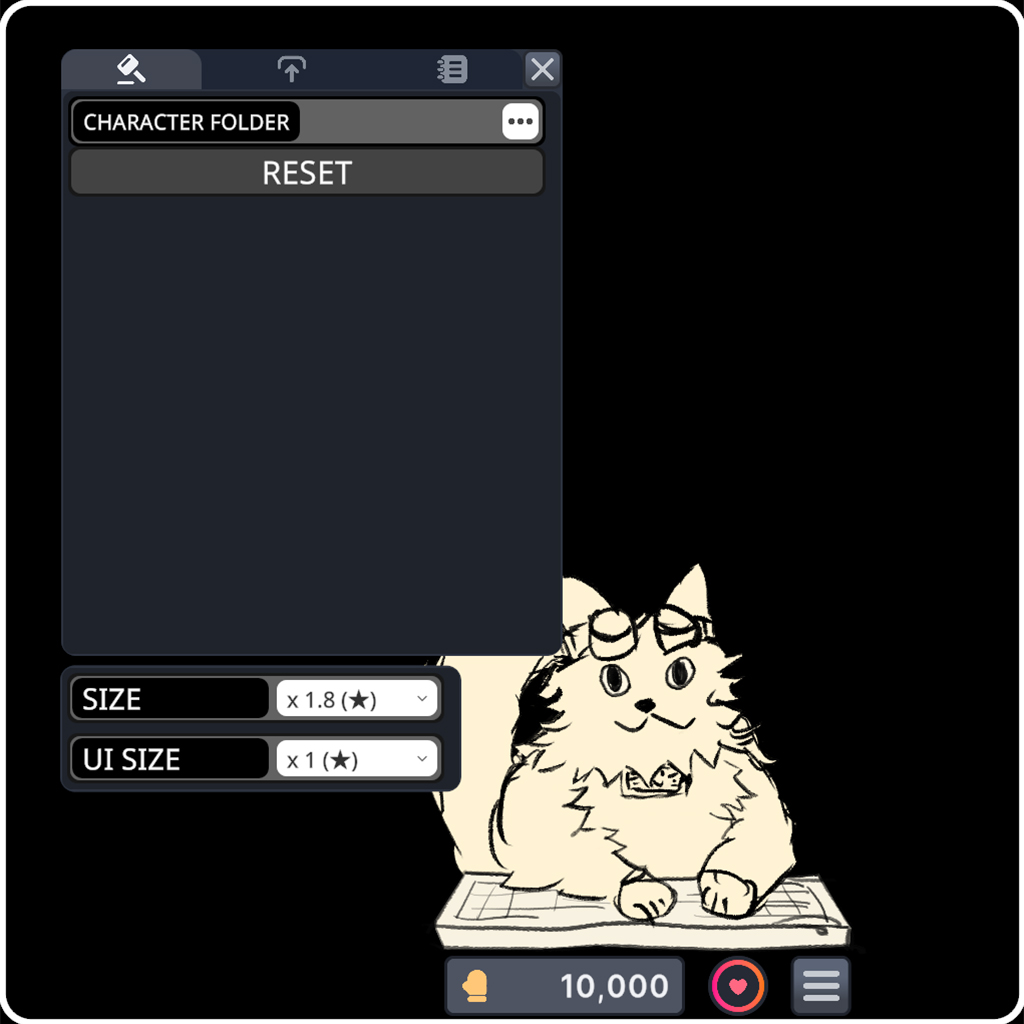
Templates & File Structure
Download a template package to get started quickly. Each template includes a working character.json and sample assets.
Image Image Template Structure
Spine Spine Template Structure
Specifications
Image Image Character Requirements
- Files: 3 PNG images — idle, click_left, click_right
- Max resolution: 4096 × 4096 pixels per image
- Max file size: 10 MB per image
- Transparency: Supported (recommended for natural look)
- Tip: Use the same dimensions for all 3 images for best results
Spine Spine Character Requirements
- Spine Editor version: 4.2 (must match runtime version)
- Export format: Binary (
.skel.bytes+.atlas.txt+.png) - Required animations:
idle(must be set to loop),click_left,click_right - Recommended image size: 512 × 512 pixels
Common Requirements
character.json— Required in the folder root. Defines character type, name, file paths, and display settings.preview.png— Optional. Used as Steam Workshop thumbnail. Recommended size: 512 × 512.
Side-by-side comparison of Spine (animated) vs Image (static) character
IMG-03 • recommended: 900x400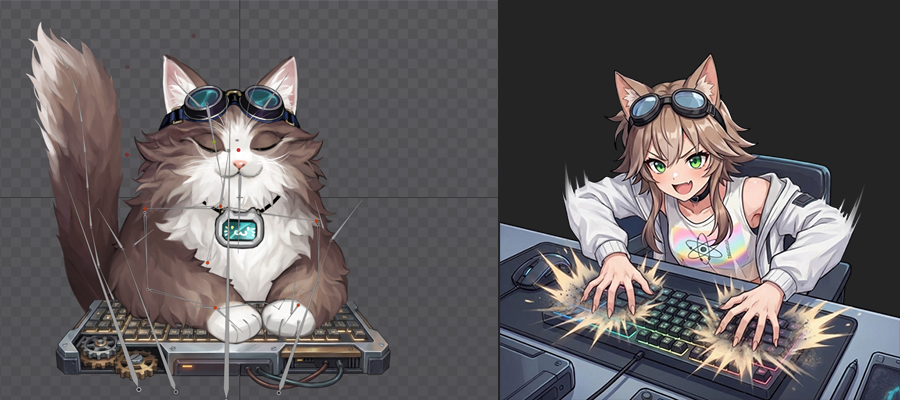
Image Character Guide
Image characters are the simplest way to add a custom cat. Just prepare 3 PNG files and a character.json.
- Prepare 3 transparent PNG images: idle, click_left, click_right.
- Recommended: use the same dimensions for all 3 images to avoid visual shifting.
- Create a new folder and place the 3 PNGs inside. Create a
character.jsonfile (see example below). - Open the Workshop Editor from Steam.
- In the Create tab, click Browse and select your
character.json. - Adjust Position, Scale, and Click Duration to fine-tune the character display.
- Click the character on your desktop to test the click images.
- When satisfied, click Save, then switch to the Upload tab to publish.
Three PNG images side by side: idle, click_left, click_right
IMG-10 • recommended: 900x300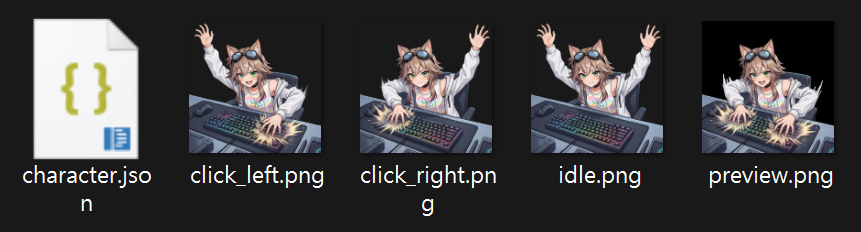
Image character.json Example
{
  "type": "image",
  "name": "MyCat",
  "images": {
    "idle": "idle.png",
    "click_left": "click_left.png",
    "click_right": "click_right.png"
  },
  "position": [0, 0],
  "scale": [1, 1],
  "click_display_duration": 0.1
}Workshop Editor Create tab with Image character loaded
IMG-11 • recommended: 1024x768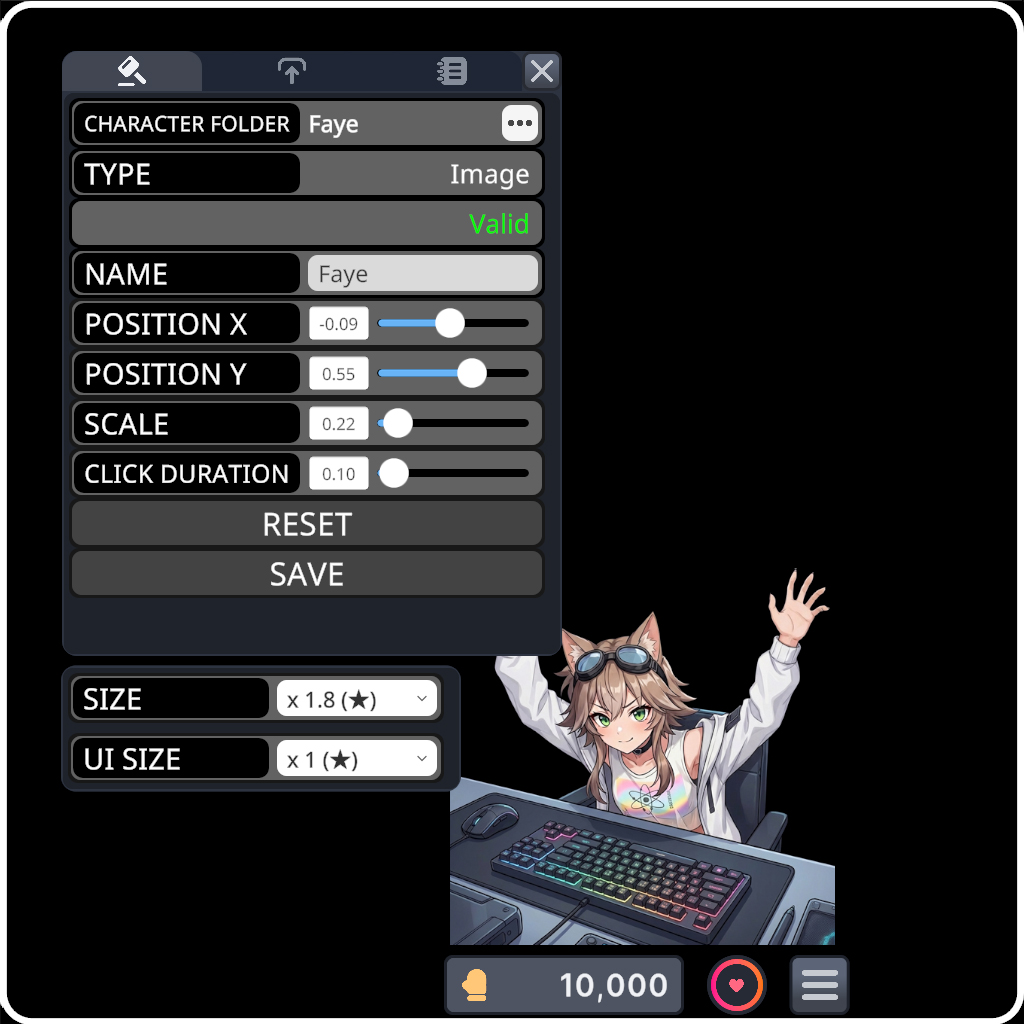
Spine Character Guide
Follow these steps to create a Spine-based animated cat character from scratch.
- Create your character in Spine Editor 4.2. Design the skeleton, meshes, and attach your artwork.
- Set up 3 animations:
idle(set to loop),click_left, andclick_right. Names are case-sensitive. - Export as binary: File → Export → Binary.
- You will get 3 files:
.skel.bytes,.atlas.txt, and.png. Place them in a new folder. - Create a
character.jsonfile in the same folder (see example below). - Open the Workshop Editor from Steam.
- In the Create tab, click Browse or drag-and-drop your
character.jsonfile. - Adjust Position X/Y, Scale, and Animation Fade Out to fine-tune the character.
- Click the character on your desktop to test the click animations.
- When satisfied, click Save, then switch to the Upload tab to publish.
Spine Editor 4.2 with character skeleton and 3 animations visible
IMG-04 • recommended: 900x600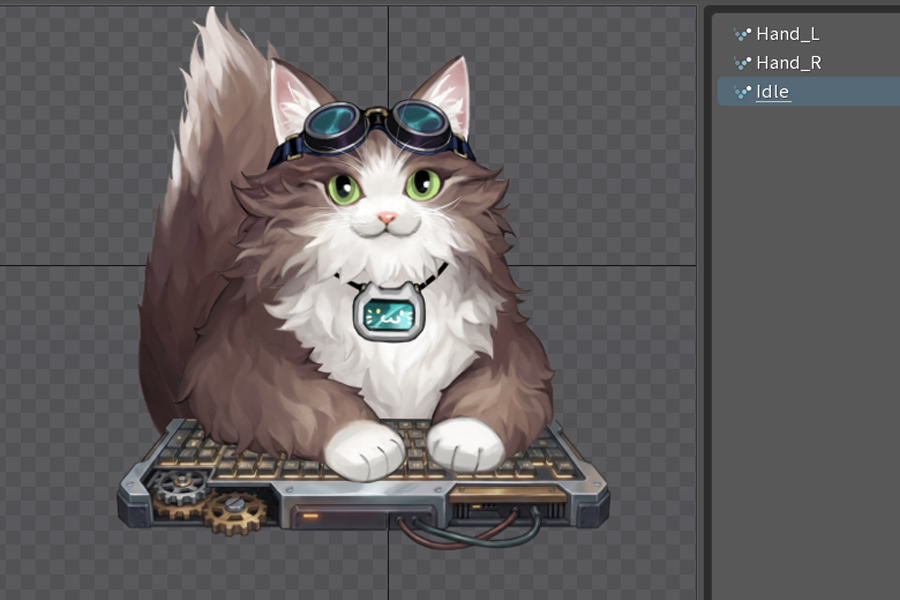
Spine binary export dialog
IMG-05 • recommended: 600x400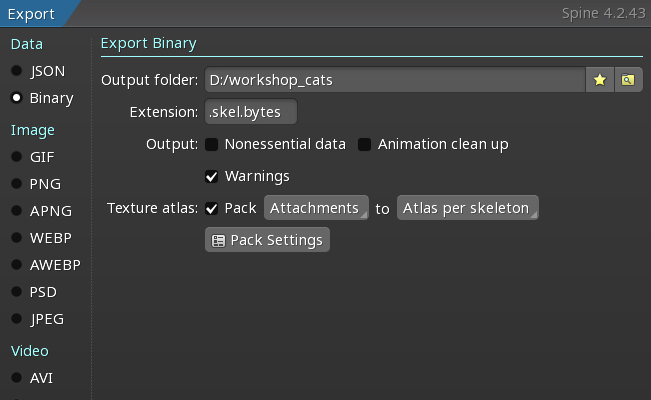
Exported files: .skel.bytes, .atlas.txt, .png in a folder
IMG-06 • recommended: 600x300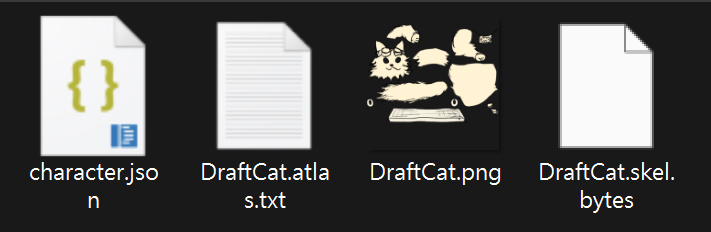
Spine character.json Example
{
  "type": "spine",
  "name": "MyCat",
  "spine_file": "skeleton.skel.bytes",
  "atlas_file": "skeleton.atlas.txt",
  "animations": {
    "idle": "Idle",
    "click_left": "Hand_L",
    "click_right": "Hand_R"
  },
  "position": [0, 0],
  "scale": [1, 1],
  "hand_mix_out_time": 0.3
}idle, click_left, click_right) are fixed names. The values ("Idle", "Hand_L", "Hand_R") are your actual animation names in Spine — change these to match your project.
Workshop Editor Create tab with Spine character loaded
IMG-07 • recommended: 1024x768
Upload Flow
- Switch to the Upload tab in the Workshop Editor.
- Browse for a preview image (PNG/JPG) to use as the Workshop thumbnail.
- Title is auto-filled from your character name (max 128 characters).
- Enter a Description for your Workshop item (max 8000 characters).
- Click Upload and wait for the upload to complete.
- First time: You may be asked to accept the Steam Workshop Legal Agreement. Accept it in your browser, then retry.
- After successful upload, the Item ID is displayed and the Upload button changes to Update.
character.jsonis automatically saved before uploading to ensure your latest changes are included.
Upload tab with preview image, title, and description fields
IMG-14 • recommended: 800x600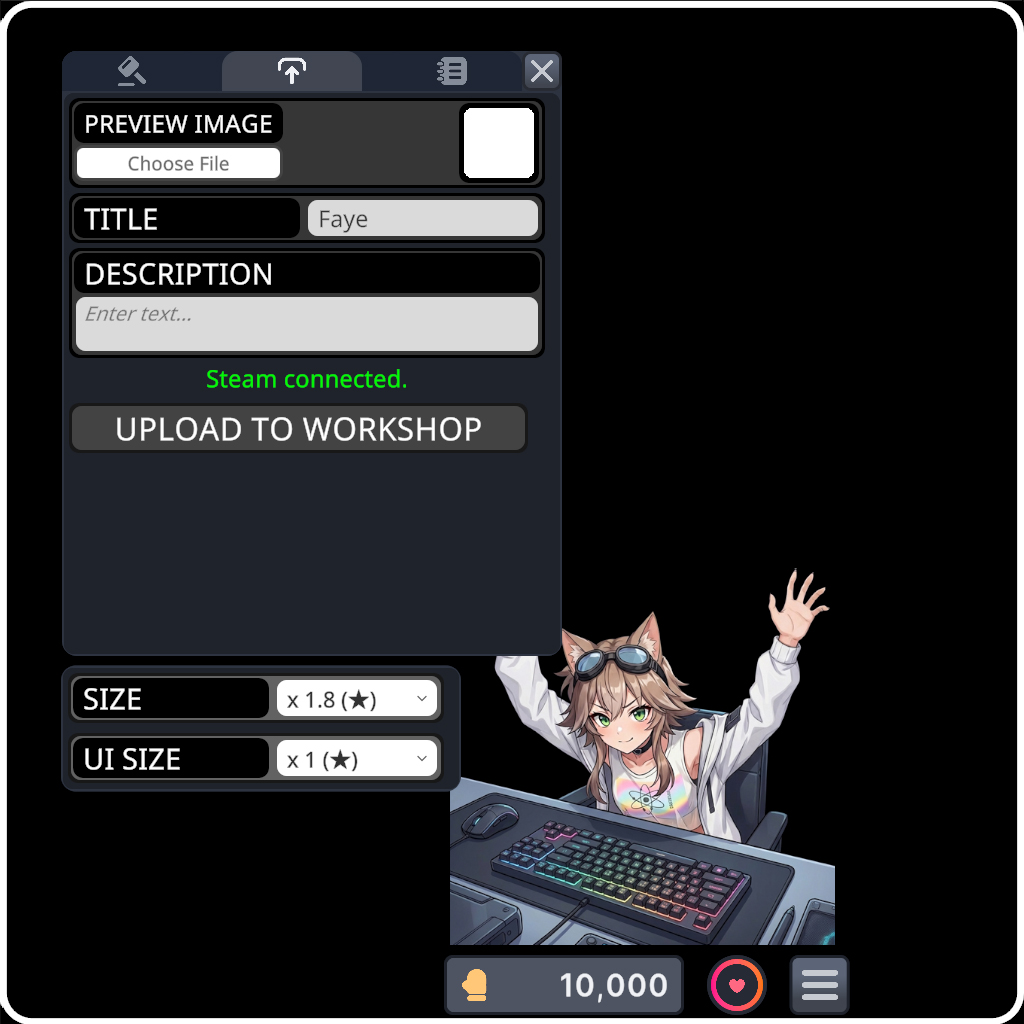
Download & Update Flow
- Switch to the Manage tab and click Refresh to load your published items.
- Your published Workshop items are listed with their title, ID, and status.
- Load: Clicking Load auto-subscribes and downloads the item, then loads it into the Create/Upload tabs for editing.
- Delete: Shows a confirmation dialog. Deletion is permanent and removes the item from the Workshop.
- After loading, make your edits in the Create tab → click Save → switch to Upload tab → click Update.
Manage tab showing list of published Workshop items with Load and Delete buttons
IMG-17 • recommended: 800x500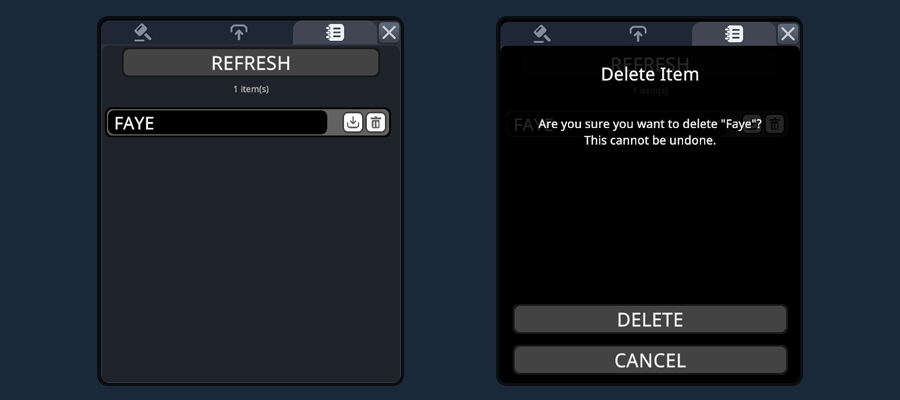
Field Reference
Complete reference for all character.json fields.
| Field | Type | Required | Default | Range | Description |
|---|---|---|---|---|---|
type |
string | Yes | "spine" |
"spine" / "image" |
Display mode |
name |
string | Yes | — | — | Character name (supports Unicode) |
spine_file |
string | Spine | — | — | .skel.bytes file path |
atlas_file |
string | Spine | — | — | .atlas.txt file path |
animations.idle |
string | Spine | "Idle" |
— | Idle animation name in Spine |
animations.click_left |
string | Spine | "Hand_L" |
— | Left click animation name |
animations.click_right |
string | Spine | "Hand_R" |
— | Right click animation name |
hand_mix_out_time |
float | No | 0.3 |
0.05 – 1.0 | Spine animation fade out duration (seconds) |
images.idle |
string | Image | "idle.png" |
— | Idle PNG filename |
images.click_left |
string | Image | "click_left.png" |
— | Left click PNG filename |
images.click_right |
string | Image | "click_right.png" |
— | Right click PNG filename |
click_display_duration |
float | No | 0.1 |
0.05 – 1.0 | Image click display duration (seconds) |
position |
float[2] | No | [0, 0] |
-2 – 2 | X, Y offset from center |
scale |
float[2] | No | [1, 1] |
0.05 – 2 | X, Y scale multiplier |
Troubleshooting
Common issues and solutions. Click a question to expand.
"Validation failed" error
Check that all required fields are present in your character.json. The type and name fields are always required. For Spine characters, spine_file and atlas_file are required. For Image characters, images.idle, images.click_left, and images.click_right are required.
"Required animation 'X' not found" error
Animation names are case-sensitive. The animation name in character.json must exactly match the animation name in your Spine project. For example, "Idle" is different from "idle". Open your Spine project and verify the exact animation names.
Character is too large or too small
Adjust the scale field in character.json, or use the Scale slider in the Workshop Editor. The valid range is [0.05, 2].
Character is offset from where it should be
Adjust the position field. [0, 0] is the center of the character window. The valid range is [-2, 2] for both X and Y. Use the Workshop Editor sliders to fine-tune visually.
"Texture exceeds 4096x4096" error
Image files must be 4096 × 4096 pixels or smaller. Resize your images using an image editor before adding them to the character package.
"Image exceeds 10MB" error
Each PNG file must be under 10 MB. Optimize your images by reducing unnecessary transparency, using fewer colors, or running them through a PNG optimizer like TinyPNG or pngquant.
"Steam not initialized" error
Make sure Steam is running, you are logged in, and you own BongoWaifu. Launch the Workshop Editor from Steam's start menu.
"User needs to accept Workshop legal agreement" error
Visit the Steam Workshop Legal Agreement in your browser, accept it, then retry the upload in the Workshop Editor.
Character doesn't appear for subscribers
After subscribing, Steam needs time to download the Workshop item. Tell subscribers to wait for the download to complete, then restart BongoWaifu. The character will appear in the character selector dropdown.
How do I update a published character?
Go to the Manage tab → click Load on your item → make edits in the Create tab → click Save → switch to the Upload tab → click Update. Your changes will be pushed to all subscribers.
What version of Spine is supported?
Only Spine 4.2 is supported. The runtime version must match the editor version exactly. Spine 3.x and 4.0/4.1 exports will not work.
Can I use Spine JSON format instead of binary?
No. Only the binary format (.skel.bytes) is supported. JSON export is not compatible with the runtime loader. In Spine, use File → Export → Binary (not JSON).
Supported Languages
BongoWaifu and the Workshop Editor support the following 10 languages:
| Code | Language |
|---|---|
en | English |
zh-Hans | 简体中文 |
zh-TW | 繁體中文 |
ja | 日本語 |
ko | 한국어 |
ru | Русский |
fr | Français |
de | Deutsch |
es | Español |
pt-BR | Português (Brasil) |
character.json support Unicode. You can use any language for your character's name.